Had to goto work today & sit around for 7 hours waiting for a truck... not going to get too into that but needless to say I had time to start a doodle & then some. I ended up with this at the end of the day & I'm pretty happy with it. I didn't get to finish it yet. It still needs a lot of definition in the foreground, but I'm pleased with the overall composition. As always please let me know what you think!
Saturday, December 29, 2007
Outer-Space BG
Sunday, December 23, 2007
Another Walk Cycle Update
Wow, didn't realize how long it's been since I posted. Been pretty busy lately as I'm sure most people have. Anyway, I fixed the motion of the shoulders (again), but I'm happy with them this time. I'm also pleasantly surprised with the head turn. Now all I have left to tweak is the hood & his elbow/forearm placement in a few frames. I may also try to emphasise his belly bouncing as well for a more "cartoony" look. Please excuse the chaotic looking lines, I'm working sans pegbar/disc so I'm using paperclips & tape to allign my drawings. Let me know what you think:
Hmmm.... in my preview the walk is embedded & plays fine, however all I get when I publish the post is a red x. Can someone please comment & just let me know if you can see it? I'm on IE, maybe firefox will show it. *shrug* Just in case you can't see it, here's a link: Walk Cycle Pencil Test
Friday, November 30, 2007
Walk Cycle Update
Nothing major, just revised the shoulders in the frames where they were out of whack, & tweaked the torso in a few spots. The overall motion looks much better now I think, but the arms still need work, they are out of place in a few frames still. The entire thing is 15 frames on 2's right now, but I might add a couple frames if I need to to help smooth the motion of the arms, we'll see how it looks when I clean it up though & go from there.
Here is the updated version:
Thursday, November 29, 2007
AF Winter Challenge - Walk Cycle
Well, got a new challenge from the Animation Forum the other day. This one is a bit more involoved than the weekly character design contests are, as we have to complete a well planned walk cycle. I'm really excited about this one as I know it will force me to push myself & I'm bound to learn something new :)
Here is the Challenge & it's description in full.
My first step of course was to do some homework. I found a number of great resources for planning out & executing walk cycles, and I suggest you give them a look. Some stuff gets repeated, but it's well worth reading. There's a ton more out there just a google search away, but these are a good base.
Idleworm Walk Cycle Tutorial
Walk Tutorial by Mike Brown
Preston Blair's page of walks (reference)
Now that I've done some research, I can start thinking about what kind of walk I want to attempt. I ended up deciding on a combination of sorts, where my character is going to walk very slowly on screen in a downtrodden/forlorn sort of way, then find something on the ground that perks his spirits up & makes him skip/prance off into the distance.
Sounds good right? So how do we do this? How do we plan it out? Well I'm loosley basing my char's walk on Preston Blair's "slouch" walk. Although I think (hope) that I've put my own touch of originality on it. But that gives me a general idea of how I want my contact poses to look. "Contact" poses are when the feet are farthest apart from each other & both touching the ground. The contact poses are the most extreme positions in any walk. Now, I don't usually give hard & fast rules, at least I try not to, but CONTACT POSES ARE THE MOST IMPORTANT POSITION IN ANY WALK CYCLE!!! IF YOU DO NOT START WITH THE CONTACTS THEN THE SKY WILL FALL AND THE THIRD WORLD WILL BE SENT BACK TO THE FOURTH!!!
Well, your walk will likely suck anyway.... Seriously, the contact poses determine the length of your character's stride. This is hugely important to the rest of your walk, and if you screw up the contacts, it will be like building a house on sand. Spend some time on these poses & it will save you LOTS of time later on. Once you have your two contact poses, the rest just needs to be filled in & the only limits are your imagination & creativity.
Here are my 3 contact poses. They are frames 1, 8 & 15, with 1 & 15 being the same drawing. This establishes a full looping walk, & even just playing these two frames will give the semblance of a walk. 
As you can see I add little notes underneath my roughs so I know what needs rivising on each frame when I eventually get to cleaning up.
Now I can put some more thought into the personality of this walk. I've already got a pose that suggests he's a little bummed out, & to stress that even further in the walk I want him to do a couple things:
1) Drag his feet like they weigh 50 pounds each.
2) Have lots of weight & take a lot of effort to lift it. I'll do this by manipulating his up & down motion through the walk, making him take a long time to get up to his high point, but coming down into his recoil position very quickly.
To plan this out, I drew up a couple of charts (I don't know the proper name for these if there is one) to help me place my frames & get a feel for the timing of the walk. The first chart shows the frames spaced in relation to each other & marked at different heights to indicate keyframes, inbetweens, and breakdowns. (with a couple mistakes on my part, but that's what it's supposed to show :)
This next one again has the frames spaced out, but this time along a motion path that I drew for the top of his head. Now the timing of the walk becomes much clearer, as you can see that he will go from the high point(frames 7 & 14) to the recoil (low point, frames 2 & 9) in only 2 frames respectively. However, to get from the recoil to the high point of the walk it will take 5 frames. This should give me the slow up/fast down motion that I said I wanted.
C = contact pose
R = recoil pose (downstep)
P = Passing pose
HP = high point
IB = inbetween *note* more of these will probably be added
Just to sum up in case it is unclear, I begin the first chart with frames 1 & 15, and frame 8 spaced directly in the middle of them. These are the three contact poses from the first image above. Right between the contact poses I put the passing poses, frames 4 & 11, so his legs will pass each other right at the mid-point of his step. I then split the distance between the contact & passing poses and added the recoil frames, 2 & 9. Then I did the same for the high points, frames 7 & 14, putting them directly between the passing & following contact poses. Now I have all my key frames spaced out, *note* on the chart I should have made the marks for frames 2 & 9 the same height as 1, 4, 7, 8, 11, 14, 15. The tallest marks represent keyframes. I then put a few inbetweens (the smaller marks) between some of the keys, to make for the timing I want. Notice all the inbetweens happen between the recoil & high point. This is how I will get the slow-up/fast-down motion I've been mentioning.
And here is what I have so far roughed out. Still have a bunch of inbetweens & breakdowns left, which are the blank white frames right now. I also noticed that in a couple frames I have the shoulders going the opposite way that they should to counter the hips. That's why it looks jumpy in a few spots. I'm probably just going to finish the inbetweens first then tweak the shoulders where necessary. Overall though I'm extremely happy with how this is shaping up so far. If you have any crits or comments please feel free to give them, I'm always open to suggestions. Also I'll post updates here of course, but if you're interested you can keep up with my progress in this thread.
Hope some people found this helpful, it's by no means a bible to go by, just a record of my workflow you can compare with your own in the off chance it's useful.
Sunday, November 25, 2007
Flip Boom! Kid Friendly Animation Software!
Toon Boom just announced the release of a new product, Flip Boom. It is an animation program with a kid friendly interface, easy to understand large buttons, and all the tools needed for animation! I decided to check out the trial version to see if this is something I would recommend to people I know. I just did a little 10 frame animation of a flower growing to get a feel for the program. Now, already using TBS, most of the keyboard shortcuts are the same, but even if it was the first time using the program, one could easily learn all the tools in almost no time. (Especially with a helpful parent nearby). The program incorporates a brush, & paint tool for drawing & coloring. An eraser tool for fixing said drawings, and a select tool that you can use to resize or move drawings, or select them to copy & paste. It also allows you to change the brush size, and if the youngster is lucky enough to have a tablet already, it supports pressure sensitivity as well. Almost forgot, it has a fairly extensive color wheel as well, 60 colors plus greyscale from white to black. You can hold 8 colors in your palette, and change them by double clicking to open up the color wheel. Flip Boom also has an onion skin feature, which is essential to animating, which allows you to see a washed out version of your previous & next drawings. It also has a feature called "Draw behind" which lets you, well... draw behind other stuff. This is extremely handy since the program only allows for one layer. With this feature you can draw something in the background wihout worrying about messing up a line or area in the foreground. It basically gives you some room for error & makes a little "coloring outside the lines" harmless. There is a easy to use, quick playback tool to preview your work, and you can view it at 3 different speeds, I'm not sure what the frame rates are, but my guess would be 12, 18, & 24, or something around there. You can export to Quicktime, SWF, and AVI as well, which is sweet. The only small knock I have is that there is no shape tool at all. I know it is meant to be simple, but I can see a kid getting a LOT of use out of circles & squares, as opposed to drawing everything freehand. Especially if they are using a mouse. It's not a huge factor & I still highly recommend this program for any kid about 12 & younger. However I would also suggest to Toon Boom that they add shapes in the future. Also 2 layers would be nice, but that may be a bit much to ask for. Anyway, here is my example of something any 6 yr old can do, & most likely do better! A quick flower growing:
Monday, November 19, 2007
The Turn Update
Nothing major, just added a very rough 3rd layer of a waitress getting "goosed." I've got a lot of ideas for things to add to this & I'll keep posting updates as I refine/add to it.
This pic is 3 sheets on top of each other, so it gets a bit fuzzy, but you can make it out.
The Turn update
Sunday, November 18, 2007
CD 20 - "The Turn"
Another week, another character design challenge at the Animation Forum. This week's was pretty simple: Draw yourself in 20 years.
I decided to put myself at a poker table, and I ended up really pushing myself on a couple of angles that I'm not used to drawing. I'm glad I did.
Little background info & sidebar: I got my "Pat the Pirate" handle from a very drunk guy at a poker game. There's a few regular games at bars near me, and one night I happen to be playing with my hair down & a bandanna on. We had just gone from 4 tables to 2, and a guy I had never met was at my new table. He was hamered & slightly annoying, but he was also a huge fish, & was donating chips like crazy... so I could deal with slightly annoying. Anyway, the next time the waitress came around, he orders a beer & then out of the blue he orders one for me too, saying "Get this guy a beer, he looks like a f***ing pirate!" And he continued to do so for the rest of the night. :) All I had to do was listen to "Dude all you need is a parrot on your shoulder!... You should get a f***ing parrot man! A parrot & a boat!" & things of that nature, until me & the rest of the table drained him of his chips. lol, it was a good time though, & the pirate thing kinda stuck as my poker persona. When I got into animation, it only seemed natural to stick with it for a pseudonym.
Anyway, the pic is done in pencil on 2 sheets of vellum, I haven't got it on one sheet yet, so I'll show them both first, then together, where you'll see I had to cut & paste & bump the contrast/brightness. I think this is another piece I should add to & finish, really happy with the hands. I'm calling it: "The Turn"
I made the drawing a 1st person perspective view, so YOU are at the table looking at me across from you. You can see that you hold the Ace/King of hearts, while the board shows the 10, Jack, Queen, and 9 of diamonds. There is one card left to be dealt. I have just pushed all me bullion on the table. The coward between us has folded. Now what'r ya gunna do ye scurvy-ridden scallywag?!
The pics are too big to embed here, so here are links, let me know what you think!
Layer 1
Layer 2
Both together
Wednesday, November 14, 2007
CD 18 walk inked
Well here is the inked version. I tried something with bitmaps for the coloring which I think I like. I'll keep playing with the idea & see what I can make with it. It certainly has some possibilities, but it seems so far to make for some gigantic files. We'll see... but please let me know what you think in the meantime.
In lieu of the media player that doesn't seem to work, here is a link:
CD 18 Walk Inked
Tuesday, November 13, 2007
CD 18 update
Added frames to the walk & got the first frame inked. I'm starting to like this character too, now I need to think of a name & a story for her :)
I'll post more when I get to the transformation. No plans to use that for anything but I think it will be a great exercise for me. I have another exercise of sorts in the works, but I may hold off until I finish that & show it step by step, because so far I like how it's shaping up. In the meantime, let me know what you think of this character & the walk so far. Cheers  .
.
The media player here won't work for me, so here's a link to a SWF version that loops: Walk SWF
Monday, November 5, 2007
CD 18
Well, another character design challenge at the Animation Forum. This week's was about a "normal" woman who on her 30th B-day makes an announcement to her family & friends.
Here is the description we got & the requirements for this week's challenge:
Ignatius Metranom is a simple woman. She has a good job at the grocery store, married to a wonderful man she met in college when they were both studying psychology. Her adopted parents love her dearly and today is her 30th birthday and she has told her family that she has an important announcement to make. All her friends and family have shown up. Ignatius is going to inform her family that she is really an alien scout from a far off land and the Earth is going to be invaded within 20 minutes.
Requirement: Design of Ignatius's two forms. Bonus points for doing a mock up of her big speech. You can also do the two forms in mid-transformation.
I didn't start until late as usuall so I didn't get anywhere near as much done as I'd have liked...go figure...
I got a simple & super rough walk cycle of Ignatius, but it's more of an animatic than a finished animation. Quite a few more frames needed, foot doesn't bend or show any weight etc, but for something I did in less than an hour it works. (animating wasn't part of the requirements anyway :P) My hope was to have her walk into a room w/her parent's & boyfriend waiting, then animate the transformation to alien form by having the alien rip its way out from inside, then proceeding to tell the crowd that "I'm not like other girls!" ...or something to that effect. Anyway, all I got done was the crappy walk & the design of the alien, but alas, no transformation. I may try it anyway just to prove to myself that I can(along with smoothing out the walk). But this is my final entry for the challenge.
CD 18
Couple points on the walk itself, while the feet suck & the legs don't quite have the motion I was shooting for, they are straight on purpose. I was trying to make her have a very short stride with quick, snappy steps. I think I'm on the right track, but it needs work & was a first attempt. I tried making her legs come forward very quickly & going back a little slower. To make up for the difference in time I ended up keeping the front foot still in place for an extra frame. It will look a lot better if I sub in a drawing of the front foot being bent & absorbing some weight. Also, if you watch the upper legs it looks decent, but the lower legs tend to look like only one is moving at times. Might be an illusion, or might be that they are too symmetrical & the very similar motion paths make it hard to tell which leg is which when they are passing. On a positive note, I do like the motion of her hands. I wanted her to be a little bit prissy looking but also plain-Jane-ish. Also since it was a quicky, I didn't have to get into pumping arms & such.
That's all for now, but I will post an update when I clean up the walk & if/when I do the transofrmation.
Cheers
.
Tuesday, October 23, 2007
I'm Back!
Where to begin, where to begin? The wedding ceremony went off without a hitch, she said "I do" on the first try, and I think she even meant it! From there we went to the reception hall, which was beautiful to say the least. I don't think we could have done much better as far as halls are concerned. The food was delicious, the staff there were all very courteous, and the host was a huge help in putting together the best party I've ever attended, let alone thrown.
It will be impossible for me to do it much justice in words, but just imagine about 230 Irish & Polish Catholics at an open bar affair, and you should get a decent idea of how festive the reception was. A couple of distinct highlights worth mentioning were the traditional Polish wedding dance, and the tossing of the garter/bouquet.
The Polish wedding dance was new to me, but the general idea is that all the men at the reception throw some money into a basket for the privilige of dancing with my new bride (pretty good concept eh?), then after she's danced with all of them, they form a circle around her and I have to break through to "rescue" her. Now from what I understand, the breaking through is supposed to be largely symbolic and should have been a relatively easy task, but no one explained that to my friends & cousins... I've literally lost fist fights & come out of them with less lumps than my friends & family gave me lol. But it was worth the ass kicking, as we collected a nice chunck of change in the basket :) I was expecting mostly 1's & got mostly 20's, but I have to give most of the credit to my beautiful bride for commanding such a high price :) Oh and for the record it took me 4 attempts to break through with the final one involving me knocking my cousin straight into Erin & sending both of them to the floor (she was fine). Then I threw her over my shoulder caveman style & stomped out in my moment of triumph.
The next part most worth mentioning was Erin & I throwing the bouquet & garter. The girl who caught the flowers happened to be wearing a pantsuit, and my the guy who caught the garter was one of my groomsmen, and we were all in kilts. So as she's sitting down she says "Wait a minute, I'm wearing pants & you're in a skirt?! How are we going to do this?" So they promptly switched positions and for what may have been the first time in the history of weddings, the girl put the garter on the guy. Needless to say the crowd loved it & everyone was hysterical laughing, especially with my cousin hamming it up & fanning himself with the flowers & acting like he was about to faint as the girl put the garter on him (probably didn't go as high as he was hoping for but oh well).
While those two things probably stick out most in my mind, the entire party was just a blast. So many friends & family members there, my only complaint was not being able to hang out with people for more than about 30 seconds at a time, but I guess that's normal at a wedding.
I haven't gotten around to picking up the actual pictures yet, but when I do I will surely post some of the good ones here. In the meantime, if you are interested, you can browse through the lot of them HERE. Be forewarned there are a ton & some do get repetetive, but there are definitely a bunch of good ones worth seeing.
Finally, after the reception, Erin & I spent 10 amazing days in Mexico in the Riviera Maya area. I've never done an all-inclusive trip before, but damn was it ever worth it! Upon arrival they handed her a fresh rose & gave both of us champagne, and basically continued to bow to our every wish for the duration of our stay. I did not hear the word "no" the entire time I was there, the amenities were all 5 star, service was amazing, and there was all the food & drink you could ever hope to consume and more (7 restaurants & 22 bars). We took a couple tours to check out the Mayan ruins at Tulum along with some horseback riding through a jungle trail & along the beach. It was all almost surreal. I do have some pics of the honeymoon, but not on this comp, so again I will be sure to post the good ones in the very near future.
Anyway, before I turn this into a novel, I'll sign off, but it's great to be back, and I hope this giant smile stays plastered on my face for a long time!
Cheers all!
Friday, September 28, 2007
One Week And Counting!
Well at this time in 7 days I'll probably be pacing around church, counting down my last hours as a single man. 4pm on Oct 5th marks the beginning of my married life. Wish me luck, I'll be sure to need it at some point :)
I'll be sure to post some pics of the wedding & honeymoon when I get back. Gonna be spending 10 days on the beach in the Riviera Maya for some well deserved R&R. I'm looking forward to all of it, and with 240(ish) Irish relatives at the reception, you can be sure it will be one hell of a party :)
Speaking of parties, I get to do the bachelor party thing tomorrow night, but I'm not sure I can promise any pics from that one :P we'll see. Anyway, I may not be posting for a little while, but I will be back sometime after Oct. 17th, hopefully a happily married man :)
Cheers all,
Pat
Thursday, September 13, 2007
Pat The Pirate Rough Model Sheet
Model sheets - yet another thing I have a hard time with... I've had some ideas lately for a story, & it actually involves my toon self, Pat The Pirate. Here is a VERY rough model of him, done with the assistance of some photos of me. I'll be the first to admit I'm not above tracing if it will help me get the feel for something that I struggle with freehand.
I don't know if that's frowned on by the art community or what, but I don't really care either. I know I can take what I have now & work it into a cool looking character that I'll be able to draw from all angles. To me that's good results & that's what I'm looking for. I actually think tracing can help improve drawing skills as it helps you to concentrate on forms & shapes, which can only improve your freehand skills.
Anyway, here it is, 3 turns on 1's & 3 on 2's. Let me know what you think & I'll have more soon as I refine it.
Wednesday, September 12, 2007
General Iron Nuts - And some TBS 4 talk
Well I finished this week's character design challenge & it's barely Wednesday! Usually I'm rushing to get these in at the last second, but this one was so much fun I couldn't take myself away from it.
Here is the final image. I'm pretty damn happy with it. Couple things off as always, but again, I still feel I'm improving, & that's enough to keep me satisfied.
Name: General Iron Nuts
Age: Unknown
Weaknesses: None
Special Move: Iron Teabag of Death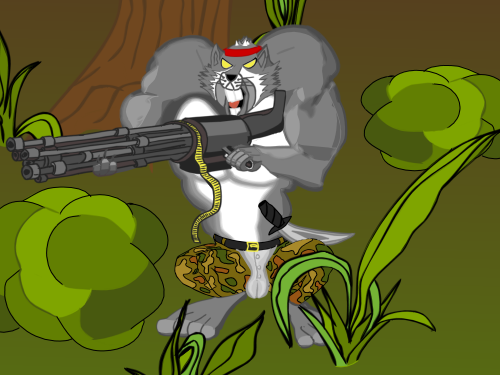
I went nuts with some of the new features in TBS 4.0. Feathered edges in particular. I've gotta say I'm a huge fan! Something I discovered while playing with them was that you can go outside the set parameters of the # of steps and their width. TBS says the width can be between 5-100, and the # of steps can be 3-30. I actually can't say I tested all boundaries, but I know you can drop the width all the way down to 1. I got some really nice results with the settings on 1 width & 3 steps. It gave the drawing a lot of depth and also added a more painterly feel I think.
Here is an example using General Iron Nut's face. The first one is exactly as drawn, and the second is with feathered edges applied to thew whole thing, using the settings I mentioned above. I used that one for the final image.
I like both, but the feathered edges really add a lot to me. It's not a huge difference, but the subtle softening of the fur on his "cheeks" makes for a greater sense of depth, and it adds a little irregularity, which is also good. I've been trying to get away from putting hard black outlines around everything. It works sometimes, but more often than not I think it makes my work look flat & 2D. Not outlining everything in black was already helping, and I'm finding that using just the right settings with feathered edges can really add a lot to my drawings as well!
I plan on posting more soon about some the uses for new features in TBS. I have one in the works already that involves using feathered edges increasingly over time to aid in the effects of acceleration & speed. With a looping background it can be quite easy to make someone run/ride/drive from zero to light speed in no time!
Tuesday, September 11, 2007
Another Character Design Challenge
Well the Animation Forum picked up their character design challenges, and I'm in luck! I've been working on my anthro-critters lately, and wouldn' you know it, this weeks' challenge is "General Iron Nuts" a squirrel with the strength of a rhino, the speed of a cheetah & the full Rambo collection on DVD. This squirrel answers to no one.
I was pumped when I saw this challenge as it's going to be a great exercise for me. I think I'm getting some general ideas down when it comes to anthro-animals, thanks to the tutorials at drawfurry & some other tips, but as always I still have a lot to work on.
Here is a rough idea of what I'm going to submit for this challenge. It's nowhere near finished, but I still have a week to work on it. I think I like where it's going though,... I wouldn't mess with this squirrel.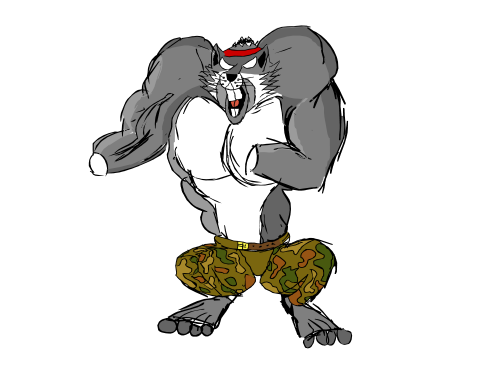
Sunday, September 9, 2007
Some Critters
Well I had a big first tonight. I actually wanted to stay at work past closing time! There wasn't even any debauchery involved! We were pretty slow tonight & I was able to get some sketching done, I had just read a tutorial on drawing anthropomorphic animal faces, so around midnight I sat outside & challenged myself to fill a sketchbook page in 30 min (I lock up at 12:30). Well, as you'll see, I didn't quite finish the page, but I'm extremely happy with what I got on it. And for the first time I ever remember I was actually bummed when it was time to close up shop! I wanted to fill that page & a few more!
Animal faces are something I've really struggled with, not that I'm very good in any department, but my animals have been particularly bad to the point that I've never posted any of them before,... and we all know I've posted some crappy attempts at art. Anyway, I got some good pointers from the tut I read at Draw Furry, and I feel like I really took a step forward tonight, even if it was a small one. I genuninely like a handful of these & will definitely develop a couple of them further. I'm also pleased with some of the better pairs of eyes. I think I can actually see a bit of personality in a couple of these.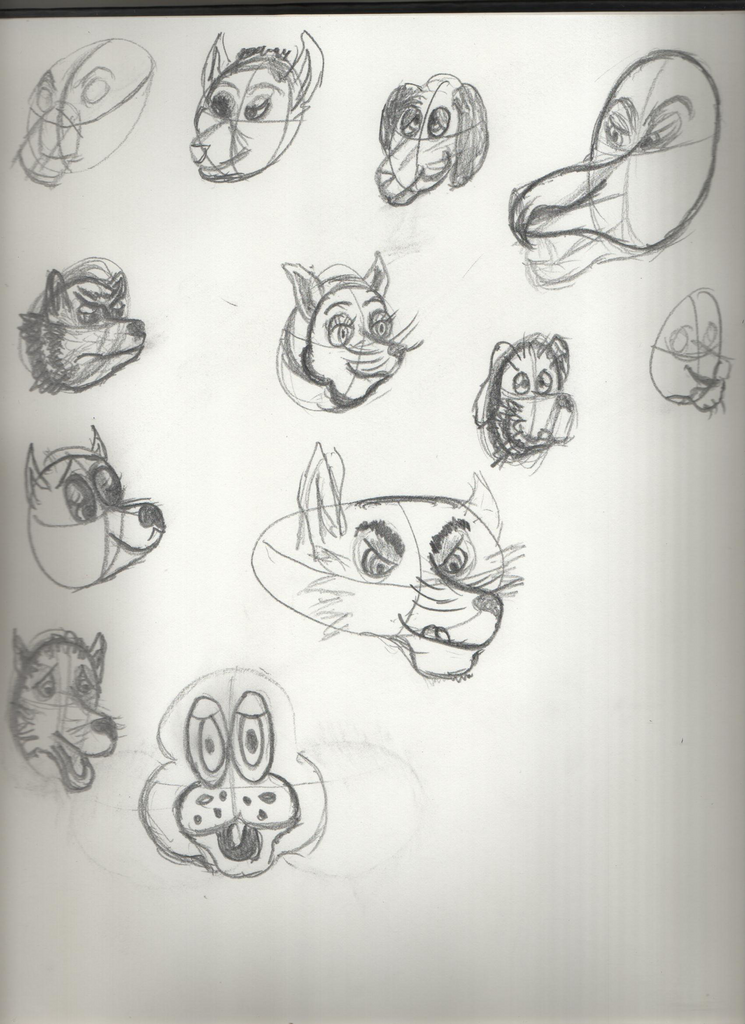
I'd really like some crits & advice on this one if you have any. I will post more as I tighten a few of these up.
Friday, September 7, 2007
14th Dimension ER - WE NEED MORE CORN!!!
Just got turned on to these two toons from one of my favorite forums, they are produced by The Nursery, and I strongly suggest you check them out. There are some obvious John K. influences here, but I don't mean that as a bad thing (today's toons could use more of it). These are the start of a beautifully rediculous series, and I hope they give us more soon.
Things I found particularly interesting are the color schemes & background styles. I'm not sure I can even say why, but it all seems to work perfectly together in helping to create this fantastic environment of the 14th dimension er.
Check them out for yourself & enjoy!
Part 1:
Part 2:
Tuesday, September 4, 2007
Couple Quickies
Was messing around with some watercolor pencils last night, I find these much easier to handle than traditional watercolor paints. Nothing special here, didn't spend much time on either one, just trying to get a feel for these things. I think I want to start working with these & oil pastels as well as my wacom. I'm hoping the different mediums can add something interesting to my toons & help give them a unique look. This should be a little easier to do soon with the new features in tbs 4.0, so I'm trying to get a head start with my watercolor practice :)
Here's a street corner, the perspective is off but I was really just experimenting with the pencils & getting a feel for colors. Spent 15-20 min on this one.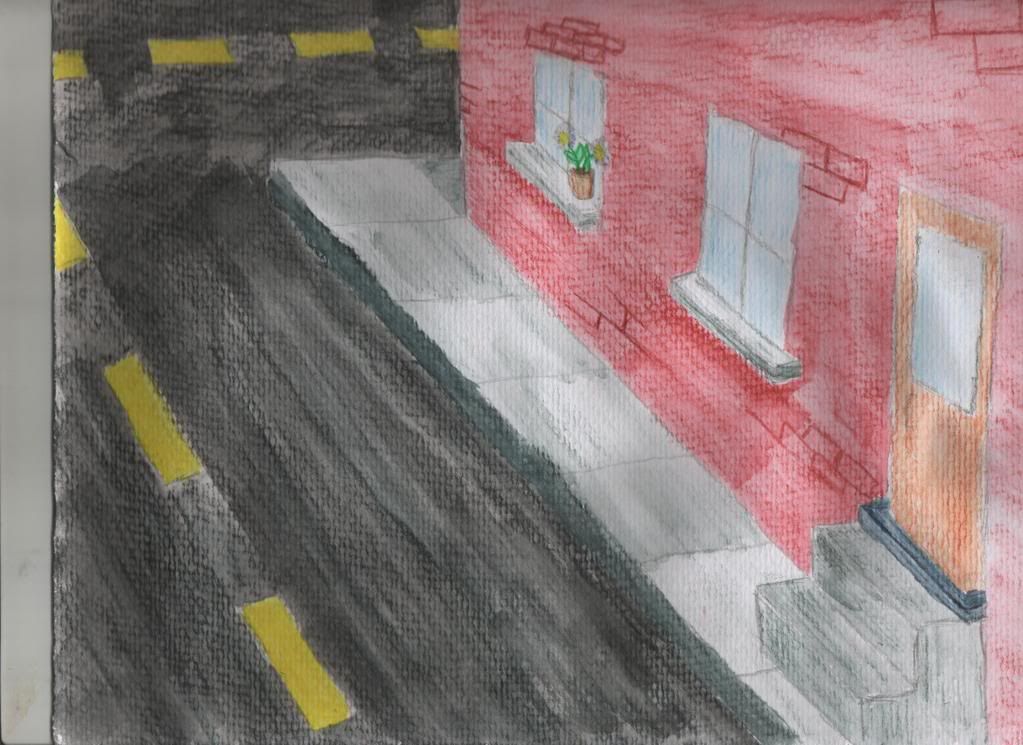
And here's my coffee mug, otherwise known as my security blanket. About 5 min on this one.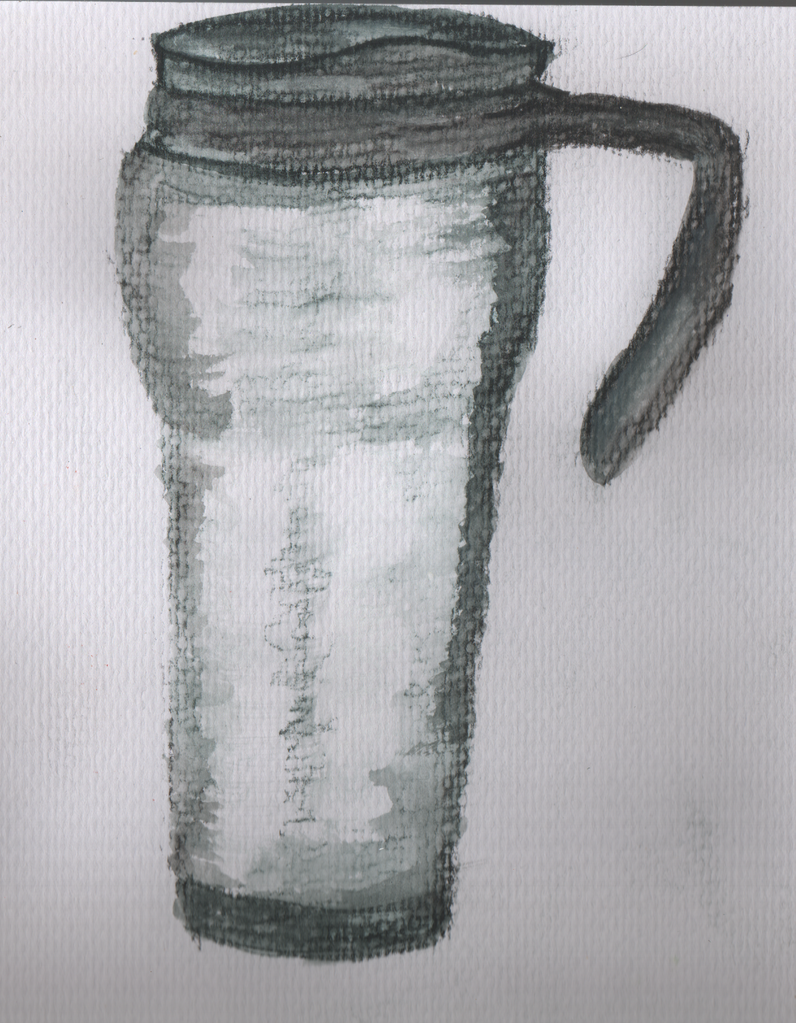
Monday, August 13, 2007
Cool, Simple Animation Program
OMG two posts in one day!!! Can you tell I'm busy at work? Just found a link someone posted to this cool looking animation program. It looks very basic, but it might be a great starter kit for a kid or anyone new to animation. I'm not sure what it is capable of, but I watched a tutorial(with no speakers) and it looks like a decent blend of simple yet powerful(somewhat).
Basically though it just lets you manipulate simple drawings either by "pinning" them down or by simply pressing a record button then moving your drawings around, then press play. This doesn't add any squash/stretch of course, but it is pretty cool nonetheless. The pinning method looks like you pin down a drawing in various spots (feet & torso in their example) then you can grab one at a time & manipulate it while the other points remain stationary. This does have some squash & stretch involved & the method seems somewhat remeniscent of "pegs" - of a sort anyway.
It also looked in the tutorial I saw like the drawings are put in some sort of box - they are circled with a tool & then a box shows around them, at which time they can be manipulated. I only bring this up because I'm curious if this is some type of "vector box" as that is one of the new features in TBS 4.0. I'm sure they are different, but I wonder if this is a sort of dumbed-down version.
Anyway, check it out for what it's worth, I think it's a neat looking program & I hate myself for using the word neat in a sentence. But maybe a kid in your life has an interest & you don't think he can handle complicated software, well this may be for you :) Here it is: Moving Sketch
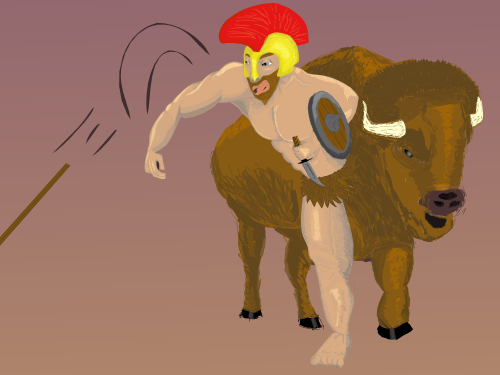
AF - Character Design Challenge 14 - Bisonator
Well this week's character design challenge was a fun one. Bisonator - half man, half bison, all gladiator. I went with a siamese twin/centaur type thing for my design. I'm really happy with the coloring & shading of the human body, but the head in general is weak - especially the mouth. I was kinda outta gas when I got to that point & rushed it more than I'd have liked, & it really takes away from the rest of him. Could've taken more time with the coloring of the bison as well, but I don't hate it. Overall I think this is a pretty good drawing for me, but of course I'd love to hear what you think as well.
Sunday, July 29, 2007
Jungle Background
Just a sketch I'm working on for a background. It will be a transition between 2 worlds, one real, & one imaginary. The jungle is the result of a boy's imagination, and he will be sitting on a rock/log somewhere in the midwest & open his eyes /look up to see this jungle. I'm going to do the foreground on another sheet to start with so I don't screw up the whole thing, but at the moment I really like where it's going. I think I'm going to trace this & attempt it in watercolor as well. We'll see how that goes...
I'll have more on this soon but I don't want to reveal too much just yet.
Heres the initial rough sketch:
And here's the shaded/detailed version:
I know there are improvements I can make, so any suggestions are welcome.
And here is the rest of it.
Sunday, July 22, 2007
A little character design
One of the forums I frequent runs a bunch of little challenges for their members to practice & learn from. They range from character design challenges (such as this one) that last about a week, to full blown animation contests that can last months. I've never really participated in any of these challenges, but I figure it's time I start. It's a good source of motivation & practice, so I will really try to get involved in more of them.
This particular challenge was a character design, here is what we were given: Name - Diamond Dan Jewels, Occupation - Jewel thief. Personality traits - intense hatred for mickey mouse. Looks - must wear sunglasses & carry a knife.
With that to go on, and having seen numerous other people's versions of this character, I decided to start off with a simple diamond shape. Then I made another one upside down, like a mirror image, and from those 2 diamonds (in green on first sketch) I made the head & face, which began looking a bit ape-ish, but I decided to roll with it. I got a couple good (I think) loose sketches of him in what I think is a pretty strong pose. It is for me anyway. I think I actually captured a "line of action" so that's a step in the right direction. I'm not thrilled with the colored version, but that wasn't the point of the challenge, & I painted it without too much thought or effort. Anyway, here they are, I will add a link to the thread with other challenge entries, but their site is down for an upgrade at the moment:
Diamond Dan Rough 1
Diamond Dan Rough 2
Diamond Dan Colored
Saturday, July 21, 2007
Great new toon
I'm sure a lot of you have seen this already, but here's a link to the pilot for "Korgoth of Barbaria". Cartoon Network picked it up a while ago, but I'm still waiting to hear when they will actually start airing episodes. The sooner the better is all I can say, there is a whole lot I love about this toon. The animation is superb, the timing is perfect & the humor is, well, hilarious. It's also got a healthy dose of good old fashioned cartoon violence. And I mean violence on a grand scale - but it's done in such a rediculous & over the top way that it only adds to the comedy. Check it out here, and please let me know if you've heard when episodes will start running.
Read more!Saturday, July 14, 2007
Happy Bastille Day!
In honor of Bastille Day (or because this was my first comic & I happen to read the paper yesterday) I am proud to present you with my attempt at humor. Crits & comments are welcome as always. I think it's decent, I'm happy with it, but I still see where I can improve in many areas. See what you think: Marie Antoinette
*Edit* I don't know why but I'm not getting the FOV that I had when I exported the toon in TBS. When I export & preview it looks how I want it(zoomed in slightly further so the top lef corner & right edge of wall are not visible), but then when I upload it to photobucket it shows these areas anyway. I'm fairly certain this is due to a stupid mistake on my part, but if anyone can let me know what exactly I overlooked please fill me in. I'll leave it alone for now, even though it shouldn't be visible, getting a glance at the awning behind the wall without the glass in front of it almost makes the glass effect better anyway. If nothing else you get to see it with & without the glass for a comparison.
Friday, July 13, 2007
Awesome Toon
I've mentioned this guy before, and since I really admire everything I've seen of his, I figure it's only natural to push his latest cartoon as well. His name is Comlock, & we are acquainted through the Animation Forum. His latest toon is almost 10 minutes long, but don't let that scare you, it will keep your face glued to the screen the whole time. What's really absurd isn't how good this is, but that he did it in a couple of weeks. Keep an eye on this guy, your kids may end up growing up on his toons. Check it out here: Comlock's Toon
Read more!Saturday, July 7, 2007
Comics Coming Soon
Hey all, just a quick note to say I should be releasing weekly comics in the near future. Blatantly stealing from my buddy Rob Campbell, I think that weekly comics will help generate more return traffic to the site. As it stands, who knows when I'll have an actuall animation completed, & I can completely understand how a site with no content would get boring fast. Hopefully the comics will keep it interesting. I think it will end up being a rather eclectic mix, as I've got some ideas for a series of father/son fishing related stuff, and I've agreed to do the artwork for a neighbor who has a bunch of ideas for single panel strips sort of in the Far Side style. I have a couple finished, but I'm trying to hold off releasing any until I'm pretty well ahead of the game, I think 6-8 weeks should cover the inevitable dry spell. But stay "tooned" I promise to produce something soon.
Read more!Tuesday, July 3, 2007
What a wonderful world
I don't even know why I'm posting this here, probably just for my own mental health, so if you're looking for something cartoon related in this post, be forewarned, you won't find it.
Where to start... as some of you know that I'm getting married in a few months (Oct 5th to be exact). Everything was going great, most of the planning is done except for a few small details, and everyone in both families have been eagerly looking forward to a great day. As it turns out, due to recent events, it will most likely be a bitter-sweet day at best. You see, Erin's Dad had a bout with cancer in his bladder a couple months ago, but we were told he was ok & that they removed it all etc etc. Well on Thursday of last week, he was taken to the hospital with bad back pain. Guess what? Cancer's back, & it's literally everywhere: Liver, lymph nodes, bones, spine to name a few. They planned on treating him aggressively with surgery, chemo & radiation, and at that point (thurs/fri) they still thought that with the treatment he would be able to attend the wedding & give his daughter away. By Friday night, the word had changed. Surgery was out of the question for a variety of reasons, but without it he was guaranteed to stay bedridded for the rest of his life, as the cancer in his bones has basically disintigrated his hip joints. It's also disintigrated 2 discs in his back which is what caused the pain in the first place.
Through Sat & Sun, all we got was worse news on top of worse news. They still hadn't (haven't) figured out where the primary cancer is, and with radiation as the only treatment option left, they wanted to target the primary if at all possible. Well it doesn't matter, because last night(Mon) his liver stopped working altogether, and the Doc said any treatment now is basically a waste & will only cause him more discomfort. All they can do now is get him on hospice care, and send him home so he can at least die in his own house. We all jokingly call him "Captain America" because he has flags everywhere he can fit them & about 500 magnet ribbons on his truck, so I wouldn't be surprised if he's got it in his head to just let go tomorrow - it's definitely his style, & it would almost be fitting in a strange way.
Like I said, I don't know why I'm posting all this, but I am. I feel so bad for Erin (and her family) right now I don't have words to express it, & the helpless feeling when you know you can't change a thing doesn't help any. It's also an all too soon instant replay of my own Father's last days, & that was only 2 years ago now. We all know death is a part of life, but saying the timing sucks right now is beyond an understatement. Erin is one of four, but she's always been "Daddy's little girl," and the two of them were looking forward to the wedding like kids waiting on Christmas. Out of the four kids, Erin is the only one having a planned/traditional wedding. She would have been the only daughter he got to give away, & it was a huge deal to both of them. I think Erin is having as hard a time dealing with that as she is with his death in general. The self-pitying part of my head just can't get over that no matter how hard you try to do something the "right" way, it seems that life will just bitch slap you for it & hand you a plate of shit for dinner - then tell you to ask for seconds.
No giving Erin away, no dancing to "Daddy's Little Girl," just a candle "In Memoriam" instead. Doesn't quite cut it, but unfortunately none of us get to make these decisions, we just get to deal with them. I don't know how she's keeping it together at this point, but she's doing as well as can be expected. Her & her family keep asking me how I did it with my Dad, & I just say I didn't have a choice, to quote Bob Dylan, "You do what you must do, and you do it well." Parts of me are finding this to be the tougher go-round. I could deal with my pain, but seeing her's & not being able to take it away is something else altogether. This I've never had to do before. And of all the people I know, life has already fed Erin enough shit that she sure as hell doesn't deserve this. Her mother has been in a wheelchair for years with chronic MS, and guess what? Two years ago Erin was lucky enough to be diagnosed with MS as well. Know what the odds of that are? Something in the range of winning the lottery. But hey, she gets to defy medical odds & wins MS for the rest of her life instead. And people wonder why I'm a cynical bastard.
I don't subscribe to any of the major religions, but I do believe something bigger than me started all this. Whoever or whatever is up there must be pissed at Erin & I for something. Either that or God has a sick sense of humor. Whatever the case, the only useful thing I can do right now is support her as she has always done for me. All I can ask of you is to say a little prayer to whoever it is you pray to that Erin & her family stay strong & get through this.
Sorry for dumping, but thank you for reading, it felt good to purge a little.
Pat
Thursday, June 21, 2007
When creativity strikes
Well, I haven't posted anything substantial lately, & that's for a variety of reasons. Mostly I've been tied up with renovations & odd jobs around the house, which is a valid excuse, but only to an extent. I've had time to draw & such but I've been using it to go fishing myself instead of making toons about it (maybe I should start doing both at the same time, could probably hammer out a few drawings when the bite is slow). Lastly, I work at a University, so since we've been on our summer "down time" schedule, it's a bit tougher for me to find a corner to hide in & draw at work. During the summer all three of our buildings operate out of one spot, so there is an overabundance of chiefs & relatively few indians, & while there's not much to do, you always have to look busy...
Anyway, today I got hit with a creative spark that I haven't felt in a while. I can't say what brought it on, but I hammered out rough sketches for 8 still panel strips! Some 3-4 panels & some just single's. They are VERY rough right now, but it won't be too much work to tighten them up when I get home. The important part is I'm pretty happy with all the gags, & I may have deveolped enough of a concept to make a series out of with a couple of them. While it will also be loosley about fishing, I've got a few strips focusing on a father/son duo in which the father, while mostly a responsible parent, finds great ameusement in teaching his son all about the things he can get away with when mom's not around. It won't be entirely dedicated to father/son stuff, I've already got a couple just involving Dad & his buddies, but I think it will be a theme that pops up more often than not.
I've been wanting to do some still panel strips for a while now, & I'm glad I finally started. As I've learned from my pal Rob Campbell, still panel strips are a great way to get frequent content on our sites & are much quicker to produce than even a short animation (especially for us one man studios out there). This helps bring return traffic to our sites, which is always a plus, keeps fresh content available, and working on a couple still strips can even be a nice break from several hours of key framing :)
All that said, I'm excited that I actually started creating again, & I will have a fair amount of stuff to show in the near future. I haven't decided how/if I'll space out the releases of each toon, but I'll worry about that when I finish them. Anyway, keep checking back, I promise there will be fresh material soon!
Cheers for now
Wednesday, June 20, 2007
Lessons for the aspiring cartoonist
My Mom was talking about starting to draw again (she did a lot once upon a time) and I told her I'd try to dig up some lessons for her to get reaquainted with the basics. While her interest is not in animation, I found this excellent site that gives short lessons on cartooning. As I read through it, I had a hard time pulling myself away from it. The lessons are very brief, just a page each, but it's laid out in a very fun to read/do way. There isn't much in the way of how to, rather it tells you what to do. Replicating each step is up to you, but there's nothing that someone with basic drawing skills can't do, and the lessons build upon each other in a very logical & well thought out way. Anyway, without hyping it any further, give these lessons a look if you need help getting started, or if you just feel like you could use a refresher. I found myself doing a handful of them just for the hell of it as I was reading along. You can find them at karmatoons Enjoy!And here is the rest of it.
Read more!Monday, June 11, 2007
Still Alive
Howdy all, I've got nothing major to post, just a note to let you know I'm still breathing. I have nothing cartoonish at the moment, the last few weeks have been extremely hectic & when I finally got a couple days off, I took the opportunity to go camping/fishing instead of animating. I'm gonna go ahead & say that's alright once in a while, we all need a break from the world. I got to sit by a fire, sing a few songs, catch a few fish (nothing to write home about unfortunately) & enjoy a great weekend full of good friends, good times, and perfect boating & camping weather. Hey even a bad day of fishing beats a good day of just about anything else, so I'm glad I went.
Now it's back to painting my room...*sigh* We picked about the most meticulous & tedious paint job we could find - stacked sadnstone to be exact. I've drawn so many parrallel lines lately it's not even funny. You want to know how many 9" x 18" blocks fit in your walls? A LOT! But I'm almost done that part, then it's a matter of taping off each color, one at a time (we're using 4) & painting the blocks in and giving them some texture. My room is on the third floor so the ceiling comes down at many different angles in different spots. I thought straight angles would be boring, so I made the wallas appear to be crumbling at irregular angles allong the slants, & allowed the ceiling paint to overlap onto the walls where the stone is crumbling away. We did the ceiling in sky blue & let it come down along the slants just a bit so when we're done it should give the illusion of looking out over a crumbling stone wall. (I hope) I think in the end it will be worth the work, but it sure as hell is a lot of work. I don't think I'll be painting this room again any time soon, but I'll be sure to post some pics when I'm finished & then I can finally get back to cartooning. Cheers for now
Friday, May 11, 2007
Cut Out Tutorial Parts 2-4
Well, I finally got a day off & I didn't have to move furniture, work around a carpenter, or do anything else for that matter. So I was able to get the remaining parts of the cut out tutorial uploaded. Parts 2-4 are all in one big file. You can view it through the embedded player below, or through this link: Cut Out Tutorial Parts 2-4. If it doesn't look good or appears stretched it's because I don't know what I'm doing, but if you right click the video after it loads, you can select zoom, then full screen, & it should look fine.
I really hope some people find these usefull. I apologize once again for taking so much longer than promised, it was admittedly more than I expected. I will continue to make these, but I think in the future I will try to keep them MUCH shorter & more concise. These ended up turning out fairly well, allthough there are certainly improvements to be made. Any places that get a little choppy, or seem like bad editing, are probably just that. But for a first & second attempt I'm pleased. Anyway, please leave some feedback, I'm curious to hear people's opinions. Read more!
Thursday, May 10, 2007
Building Drawings From The Ground Up
This is something I've discussed before, but it's worth metioning again, and again, and possibly a third time. It's about the importance of building a drawing up from a loosely drawn, rough sketch. Last time I talked about using different colored pencils for each stage a particular drawing goes through, which makes it easier to follow your "good lines" and avoid the bad ones. I find it also helps to leave any & all bad lines that you can, don't erase them, just draw over them with a different color. This will help you avoid the bad lines, whereas if you erase them, you will be much more likely to draw the same exact line again, which only leads to frustration.
That all said, I stumbled on this guy Comlock's site through a forum I visit. I'm not sure how to say it best, but what he touches turns to gold. He has his portfolio on his site, which I strongly suggest you check out. He also has a tutorial section in which you can see his artwork develop. Please take the time to look it over, especially if you have a hard time capturing weight, movement & emotion in poses. Don't worry about skill level involved, the same principles apply to building a drawing no matter what the artist's skill, and trust me, my best work can't even approach Comlock's worst, but I can & do learn from the approach he takes. Hopefully you will find his sketches, paintings & animations as informative & entertaining as I have.
Thursday, May 3, 2007
I Thought This Only Happened In Cartoons....
So as it turns out, some of those old toons were apparently documentaries about the dangers of fighting kangaroos. And you thought they were just for laughs...
OK that was annoying the hell out of me, I thought it would only play when clicked, but no such luck. Anyway, here is the link instead of the embedded player.
http://www.dumpalink.com/videos/Man_vs._kangaroo-ali4.html
Wednesday, May 2, 2007
Tutorial Update
I recorded the audio & video for the remaining parts of the cut out tut this morning. Didn't have enough time to get them synched up before work, but do know that they are almost complete & will be added asap. The going is getting better with each attempt, so just bear with me a little while longer. Hopefully it will be worth it in the end.
Read more!Monday, April 30, 2007
TBS Cut Out Tutorial pt 1.... FINALLY!
OK, here is my first attempt at a video tutorial. Throughout the following I will give a demonstration of how to set up a cut-out character using Toon Boom Studio. I'll take an original drawing, and show you how to cut it into pieces, then rig those pieces up much like a puppet so that we can finally set our character into motion. I have brought in most of the elements of my character prior to the tutorial, but I do give an example of how I got them into the exposure sheet from the global library. If you feel like you need some more instruction on the fundamentals, or if you don't quite understand how I got to where I begin the tutorial, please check out Steve Ryan's video tuts, which you can find links to in the TBS forums. They cover TBS from the very basic stuff on, & even though they were done for V 2.0, they still apply in almost every sense.
If this tutorial is any good at all, it should leave you with a basic understanding of cut-out characters, and how to manipulate them. Going hand in hand with that I will touch on the use of pegs in Toon Boom, which are an extremely useful and versetile part of the program. While this tutorial is not dedicated specifically to pegs, I should be able to give a few decent examples of the many ways in which they can be used. Hopefully someone learns something useful here, that is the idea of course. Please leave me any questions, comments or suggestions either here or via the toon boom forums.
The video quality isn't the best, but anyone using TBS should be able to follow it without any confusion, just some lines get a bit messy looking, and for some reason my cursor doesn't retain the shape of the tools I use, it always looks like an arrow. Not sure why, but any time I change tools I say what I'm doing, so you should be able to follow along. Other than that all I'd really like is for it to be in full screen size,... if anyone knows how I can embed it as such please let me know, you can see everything, but full screen would be a little clearer. This may be the best I can do working within the confines of free video hosting but I will keep trying. Anyway, without further disclaimers....
Click here to watch "Cut-Out-Tutorial-pt-1"
I hope it's helpful & logical. That's just part one, more is coming very soon where we will set up peg heirarchy, play with the Z-axis, set pivot points, and finally put our character in motion. Stay Toon'd!
Tutorial Update
Ok, after MUCH fooling around with the settings on my screen capture program, I've finally had some success. Recording audio & video together wasn't working for me no matter what I tried, so then I tried playing the video back with the sound muted & recording the audio over top. That didn't work either. Finally this morning it dawned on me to record the audio by itself in Audacity, and setting my screen capture to record audio from the speakers, not the mic. This seemed to make a huge difference, and there is barely any gap between audio & video now.
Due to file size, I've also broken the tut up into several chunks. It will probably be 3 or 4 in total, but they will break at logical places so it's no big deal. Best I can do with limited video hosting. Anyway, part one is complete & in working order, and I now know how to get good results so the other parts will be finished pretty quick. The only reason part one isn't up here now is that I finished it 30 seconds before leaving for work, so I will try to upload it tomorrow morning. Sorry it's taken this long, I thought the process would be a bit more straightforward than it turned out.
Cheers
Saturday, April 28, 2007
Episode 1 Script
I just finished the script for episode one of "The Early Birds". I'm actually very pleased with it as it stands. If I tweak anything it will be the ending, I'm not sure I have the best "closing line" so to speak, but it's not bad. You won't know if I tweak it anyway since I'm not going to show you the whole thing, but I will show a part of it as an example of the scriptwriting process.
In the overall workflow, I tend to write scripts just after or near the end of my character design phase(note that the char design phase never really ends, just watch bugs bunny evolve over 50+ yrs). Anyway, I don't know if that's a necessary order, in fact I'm almost sure it's not, but for me it is, that's how my head works. I start with an initial concept, in this case it was something to do with fishing buddies. From there I start figuring what these characters will look like, and along with that, what they will act like. I don't need to know every detail of their personality just yet, just generalities at this point. But that is enough to start writing, which helps bring out more specific personality traits. I could never start storyboarding or anything else before I wrote a script. If you can, I'm really in no position to knock it, but I honestly wouldn't recommend it either.
As with everything else involved in creating a cartoon, scriptwriting is a process, it involves many revisions, however slight they may be. You may find you end up trashing the majority of your original script by the time you finish a project, even though it seems like a waste of effort, it's perfectly fine, that's the nature of the beast. A script must evolve & adapt in order to get the timing and flow that is so important to any production.
As an example I've posted one page of my first draft, and the same page, but from the 4th draft. I don't think there are too many changes except for some minor wording, but even that can make a difference. The most obvious change is from chicken-scratch to typed. Everyone works differently, and I tend to do most of my writing in the wee hours of the morning while sitting in bed. From there, as you can see, I obviously have to type it or even I wouldn't be able to read it. When I type my scripts I use (more or less) the industry standard format. I don't include everything to the letter, but I do as far as starting off with a description of the scenes establishing shot, & center justifying the dialogue. Something I do on my own is add little references for my storyboard. You'll see circled numbers on the handwritten page & highlighted text "SB #" throughout the typed version. These refer to my storyboard notes.
I don't know if storyboard notes is the proper term or if it even is a term, but what I like to do before drawing anything is to visualize & write down what I want to draw. I number these notes & the #'s correspond to my yet un-drawn storyboard sketches. I do this as soon as I write my first draft of the script & I make revisions to both, because they act as a unit. When I write all these notes out, I plug the numbers into the script, & it gives me a great feel for the timing of the action before I even draw a single sketch.


Now I have a much clearer mental picture of what to draw & I can start storyboarding. I also know how many storyboard sketches I will need (give or take a few). Sometimes I need to add more boards to really capture a certain motion or get timing just right, & when this happens I just make a new note & call it "SB#a". I find this whole process keeps my thoughts & workflow fairly logical, & so far it's been working well for me.
That's all for now, hopefully I threw a useful tip in there somewhere. I hope what you can see of the script looks promising, it's funny how tempting it is to seek opinions from everyone who will read it, but I don't want to go giving it all away now... so you're only getting a page. I'll be sure to post some storyboards once I have enough to be worth looking at.
Cheers,
Saturday, April 21, 2007
Only 99,000+ to go!
I just found this while stumbling around for something to read. It's a book by Hugh Kenner entitled "Chuck Jones: A Flurry of Drawings." I haven't read the entire thing yet, & I started out of order with the chapter called "Termite Terrace," since that's the page I first came upon, but it didn't seem to matter. It is very well written & provides a great deal of insight into the series of events both planned & unplanned that resulted in some of the most creative & talented minds of the day coming together in a veritable "perfect storm" of cartoonists. I'm speaking of course of names like Tex Avery, Chuck Jones, & Bob Clampett, all of whose work is the stuff we call genius.
There is really so much I want to comment on just from the single chapter I read, but I will try to keep my commentary shorter than the book itself. For one thing, I took note of what Chuck said regarding his mother's encouragement when he was young. She never criticized him, but just as importantly, never excessively praised his work. Rather, she would comment on the colors, shapes & such that he used in each piece. He also made the point that she didn't look at his drawing first, she looked at him. His eyes were enough to tell her how she should react, and she obviously knew her son well, because her encouragement paid off in spades down the line.
Also, it is obvious what an influence literature had on Jones, particularly in the area of character design. Kenner was sure to point out how much thought Jones actually put into his characters seemingly random & wacky behavior, but everything was done for a reason.
Something else I found extremely interesting was the fact that much of what came out of Warner Bros. in the early 40's was almost accidental. In a sense, some great toons came about throught the neglect of Jones' boss, Leon Schlesinger. Hugh Kenner refers speciffically to the Minah Bird toons, which Jones' could't even believe was ever released. What's funny is that up until that point, WB had been chasing Disney, and were seemingly desperate to imitate Disney's "perfectly drawn" style. Cue the role reversal, because with the release of Minah Bird, Disney began trying to capture & emulate the "gag" style of Warner Bros(coincidentally with no more success than WB had in imitating Disney).
Finally, what Kenner makes abundantly clear about Jones is his work ethic. Jones is famous for saying we all have 100,000 bad drawings in us, & it was his belief that one should expel all of those failures as quickly as possible. I can't even wrap my head around that number, but it seems like his 100,000 was nothing more than proverbially clearing his throat, & once they were done it was time to really start. START!! after that many drawings... start!? I suppose I'm on my way though, since more of my drawings are bad than good the numbers are beginning to stack up. It's unreal to me just how many cells of animation this man has produced, I wouldn't be surprised if he could throw a stack of cells in the air & have them all painted before they hit the ground. Something to aspire to...
Friday, April 20, 2007
Getting Permission To Use Copyrighted Material
I mentioned in my last post that I want to use Louis Prima's "When You're Smiling" as the theme song for my Early Birds cartoon. I can only assume there are plenty of people like me who would like to use real songs & such, but either don't know how to get permission, or think it will cost too much. I'm sure there are also a percentage that just use songs anyway without permission. That's at your own risk, but the way I look at it is this: If I ever DO get my stuff seen by as many people as I'd like, then stealing that song will only bite me in the ass. It's probably pretty safe if no one sees your stuff, but beware success if you choose to use other people's material without permission. Anyway, here is how I've gone about asking to "borrow" Louis Prima's song.
The very first thing I did was of course google Louis Prima. Upon finding his homepage I just used the "contact me" link, and asked some preliminary questions to find out who I needed to contact in order to get permission. I also gave some basic info regarding the project I'm working on & what I want to do with the song. Gia Prima,(not sure what relation) was kind enough to reply to my questions, and quickly at that. She gave me the name of the record company and the publisher who own the song, & informed me that I'll need a permission license from both parties. She couldn't give me any guarantees of course, but wished me luck & seemed to take a genuine interest in what I'm doing here as well. She even asked me to send her the toon, which I thought was really cool. I will post an update when I hear anything from either the record co or publisher, hopefully with good news, but either way, I thought I'd share the process of seeking permission for copyrighted material, & I hope you find it useful.
Cheers
Sunday, April 15, 2007
Some storyboards for intro to Early Birds & the purpose they serve...
Before I say anything else, let me make it very clear that I am not a professional (or even very good) storyboard artist. But I know I'm doing at least one thing right with it & that is leaving myself a very clear set of instructions for the animatic and eventual finished piece that are to come. This is of the utmost importance when storyboarding, as it is one of the most fundamentally important parts of the pre-production phase of any animation. A completed storyboard should resemble a comic strip, with still panels of the key moments in the action conveying the story. The finished storyboard will therefore serve as the best & only blueprint that you will have to work with as your project progresses, so you will want to put some effort into this phase to save yourself a lot of heartache down the line...
If I have an idea for how I want something to look, or how a certain action will be timed, I would never be able to make it work if I just started my project by trying to draw each & every frame once & once only. Everything is a process, and the storyboard is a big part of the animation process (not to mention TV & Film). If it is neglected, it will certainly be noticeable in the final product. Here is a great post I found in the archives of JK's blog which articulates the importance of storyboarding much more clearly than I could hope to do.
There are many sites that give lessons & tutorials about how to create storyboards, a simple google search will find you a bunch, & be careful as they don't all agree with each other completely. They do however emphasise the importance of clear communication. This may be obvious if you are working in a team environment, but is often overlooked just the same. Equally bad, many people feel that storyboarding is completely unnecessary if they are working on a project alone. Big mistake. Communicating effectively with yourself is just as important as communicating with a co-worker. There are plenty of times I go a day or two without being able to touch my work, and if I didn't leave myself clear notes & illustrations to come back to, I'd be totally lost. Saying you keep all your ideas "up here" in your noodle is just a recipe for disaster in which you are bound to forget that one perfect idea you had the other day.
There are storyboard templates available online to download, programs specifically designed for digital and/or traditional storyboarding, and of course the option I choose with most things in life... making your own. The template I've been using so far was created very simply in powerpoint, and is doing the job for me thus far. All I needed was a white rectangle, a yellow rectangle & a few lines for notes. I have a few alterations in mind, such as leaving more space for camera notes & dialogue, but I've been able to squeeze in what I need so it's nothing major. You could just as easily make your own with simple programs like paint, & powerpoint, or use something more advanced like photoshop or toon boom, and customize your template to your liking. Just check out some examples of professionally used templates online & include the elements you will need. Moving on...
I have a good number of storyboard sketches for the Early Birds intro that I'm working on. Some of them are rougher than others, but as with everything else, they will be refined along the way. Ideally, I want to use Louis Prima's version of "When You're Smiling" (or at least a portion) as the theme song for the intro. It has a great tempo, is catchy, & I think it will help with the old school feel I'm trying to achieve overall. What I've got so far will help me as I work on the timing of certain actions that I want to go along with specific parts of the song, & you can see that in some of my notes, if you can read them that is. 


So far I have 16 sketches done, and I don't think I'll need more than 20 - 22 to finish it up. I will, however, add some more panels in certain spots to elaborate on key poses & action sequences. Some specific examples of this would be panels 2 - 7, in which Larry is all over the place. Ron's actions are slower & more deliberate here, but I will most likely draw out Larry's actions on a larger sheet & insert more panels (i.e. 2A, 3A, 3B, etc.) until I get the timing & flow that I want. I'll do the same with panels 13 - 14 as well, as I want to perfectly time Cyn being yanked out of the ground, stretching waaaaaaaay out, & then snapping back into shape. Also, the first camera moves happen through these panels, so I want to polish them up & make sure I get the right field of view. I also included the blank panels 17-20 to show how a tiny note to self can be so helpful. When I have time to work on it again, I'll know right where I left off & what I had planned at the time.
That's all I've got for now, I'll get the rest of the storyboard up as soon as it's finished, and hopefully an animatic shortly after that. I just downloaded a screen capture program as well, so I may take a stab at doing a video tutorial on something Toon Boom related.
Cheers for now...
Tuesday, April 10, 2007
Larry Facial Expressions
Well, I promised to be done by this afternoon, & no matter how you slice it, it is most definitely after noon... I did manage to get finished though, & I had a lot of fun with this exercise. It was a challenge for sure, not so much in technical difficulty, but in that I really had to force myself to visualize what Larry would look like with each expression. I'm glad I did it though, & I can honestly say I didn't cut any corners, at least not knowingly. I'm not married to all the colors, but for the most part I like them. Still need to play with the inside of his mouth a bit, & his hands as well. Should I make them separate from the arm like in the "Yell" pose? or just have them blend in as I have it in the rest of the drawings? Any auggestions are appreciated.
Now without further adieu, here are my first and second drafts, along side Preston Blair's version using Jerry. This is a good example of using different colored pencils on the rough sheet in order to get the good lines for the inked version. Hope you enjoy, & please let me know where you think I can make improvements. Also, I don't like the image quality on this file, so here is a link to a better image of Larry.


Monday, April 9, 2007
Updates soon!
Just a quick note in case anyone is checking. I have completed my page of facial expressions for Larry, & will have it posted here by tomorrow afternoon at the latest. Along with that I should have a few storyboard sketches to post as well. Finally, if not tomorrow, hopefully on Wednesday I'll have a post comparing & contrasting hand-drawn, frame by frame animation with cut-out characters in Toon Boom Studio. Thats all for now, keep checking in.
Read more!Wednesday, April 4, 2007
Drawing, poses, and character design tips
I made some comments about character design in my last post, and I've been involved in several discussions lately involving the drawing process (yes it is a process), so I thought it would be useful to show how these are of the utmost importance to a quality toon. I will start with drawing. When I first got into cartooning & started drawing a lot, I was absolutely addicted to my eraser. I used it more than I used my pencil, but my drawing skill was not really improving. Maybe eventually I got close to what I wanted, but not usually, & even if I did, it was hard to ink the right lines on a new page because of so many rubbed out lines on the first draft. I was advised by some people to stop using the eraser and instead use different colored pencils to correct bad lines. This was some of the best advice I have ever received, because by leaving your bad lines where they are, you can draw a good one where they aren't. Whenever I erased anything, 90% of the time I drew another line right over the one I just erased, then erased it again!(rinse & repeat?) When I started sketching in color, it became much easier to alter my drawing without erasing, & you can see that in a couple sketches on my last post. The end result of this method is that in time you will end up being able to make more confident strokes with your pencil/pen, and you will be LESS prone to making the same mistakes, whereas when you erase all the time, you will be just as likely to re-draw the same bad lines.
Another thing I find to be an integral part of the drawing process is making revisions. I usually start out with a very loose & rough sketch that captures the general idea of what I want, i.e. body position, size etc. Then on a fresh sheet & using a light table, I go over all of the good lines from the first drawing & tighten up the bad ones (this can be done digitally in TBS using the light table feature). This usually leaves me with a decent drawing but probably not perfect. This is where I look for details that could/should be added. Mouth positions, facial expressions & hand gestures can all add tons of personality to your drawing if they are done properly. Doing them properly requires as much or more discipline as it does talent. That may sound strange at first, but the fact is that the world is full of extremely talented individuals that never had the perserverence or discipline to amount to anything. *steps off soap-box*
So, now we need to work on some of those expressions & poses. This part of the process takes alot of thought, and the more you put into it, the more you will get out. The best tip I can give is to follow in the footsteps of Preston Blair. He was one of the most talented cartoonists there was, and whether you know it or not, you all know much of his work from Disney & MGM. The following pics are pages from his books that illustrate alot of what I said about building a final drawing through a series of revisions & stages. I'm sure his drawings carry more weight than my words, but to futher illustrate the importance of doing all this, I will give myself a homework assignment & try to duplicate the page of facial expressions using my character Larry. It will be a challenge for me, but I will be better for having done it, and I strongly suggest you do it too.


Thursday, March 29, 2007
Introduction to "The Early Birds"
This post isn't meant to be a bible on what order to do things, because I am certainly no authority on the matter. In fact, maybe some people can clue me in on things I am doing wrong, because I'm sure I'm making plenty of rookie mistakes. Anyway, I have an idea for a series that I've just started working on, so I figure this is a perfect time to start sharing my workflow & such. This blog won't be 100% dedicated to this series, but since I'm starting the two at the same time, it will be a good opportunity to share my creative process as it unfolds. Hopefully some people will benefit from reading it along the way, and anyone with advice or tips for me is certainly welcome to share them.
Step one in the creative process is obviously generating an idea. I'm sure everyone's brain works a little differently, but I know that the majority of my ideas (or at least the good ones) seem to happen spontaneously, so based on that, I would advise anyone & everyone to always carry a pad of paper & a pen. When you have an idea, write it down, or you will be cursing yourself later. Now I had wanted to do something with a couple of fishing buddies for a while, but that was all I had, no artwork, no script, no setting, no character personalities in mind, just an idea for a buddy piece that revolved around fishing. So I just kept that much in the back of my mind until something else came to me.
So I'm working with an idea involving 2 buddies, & the obvious path is the standard odd couple spinoff, or a beavis & butthead/ Bill & Ted/ Wayne's world type thing, which is O.K. but played out. So then I thought of something more like a Tom & Jerry or Coyote & Roadrunner relationship, which again is all well & good, but been done a million times. Then I decided based on a quick sketch I had done that my fishing buddies would be birds... no reason other than I liked the sketch & it looked something like a bird crossed with Grover from sesame street.
Now I have two buddies that sort of fall into the "Tom" & "Coyote" role, but who is "Jerry" or "the Roadrunner?" Well, fishing buddies need bait, & birds eat worms, and there's no bait more timeless than the humble worm, so... I found my third character, & more importantly, my "Jerry." At this stage I have the general idea for the overal story, two protagonists, and now my antagonist. I also have a few initial sketches that I've done which you can see here: 


This is the character design phase, where I put some thought into who these characters are, how they move & what their personalities are, and of course try to bring all of this out in the drawings. The best example I have of this so far is this walk cycle of Larry. The first 7 frames I like, but I did a horrible job on the second half of the cycle, I was in a big rush to ink it, the pencil drawings actually look better. It is 13 frames on 2's, & as it stands right now I'm happy with the motion except for frames 8 & 9, I need to have his right leg look more like he is swinging it out to the side as it comes around. Anyway...
The main characters are Larry & Ron (I'm not married to the names but for now...) and of course the worm, I'm thinking he'll be called either "Cyn" or "anti" - more on why later. Anyway, Larry is a turkey vulture. He is a very laid-back, relaxed country boy, sort of awkward & goofy but still the man. He fishes because there is no better way to spend his time, plain & simple. Ron is more of the NRA type, donned in cammo gear, militant patriotic attitude etc, that fishes & hunts for sport. Now I have been using the names Larry & Ron because my first thought was to take a political angle with this toon, having Larry represent my liberal views while Ron represents my conservative ones. The worm is going to be loosely based on Antisthenes (student of Socrates & founder of the "Cynic" school of Philosophy) hence his name being either Cyn or Anti. He will be the one who points out the plethora of hippocritical behavior that he sees in both Larry and Ron. I also envision him with a big time Napoleon complex, he will have a tough-guy attitude & will always be ready to kick ass & take names, but alas, he is a worm.
I'm pretty comfortable with the characters right now, & think they have the potential to play off each other quite nicely if I can manage some decent scripts. At the moment I am still developing exactly what each character will look like from all angles, & figuring out how I want them to move. Aside from that I have been laying out some backgrounds & landscapes to try & establish the world they live in. Here are a couple super-rough sketches of Larry & Ron's bedrooms I have so far, they're totally out of proportion & perspective, but they capture the general idea I want.

Well, that post was longer than expected, but I've been writing it in pieces for a few days. I'll try to keep future posts shorter & more frequent, but I hope it was worth the read.... probably not.
Subscribe to:
Posts (Atom)


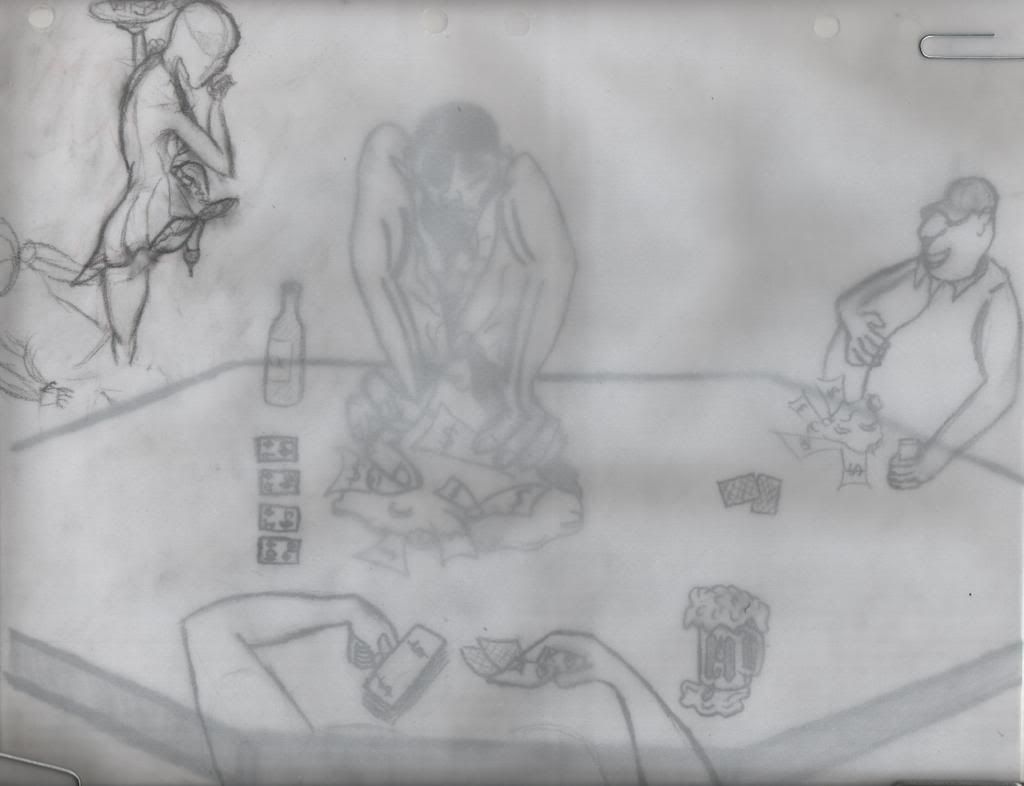
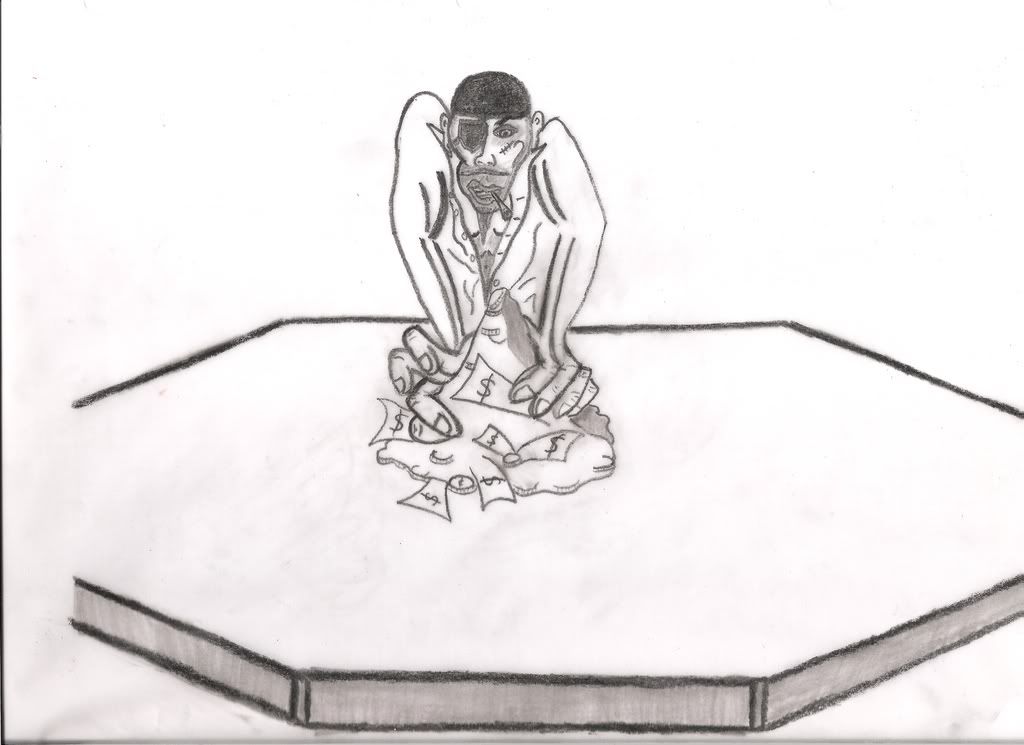
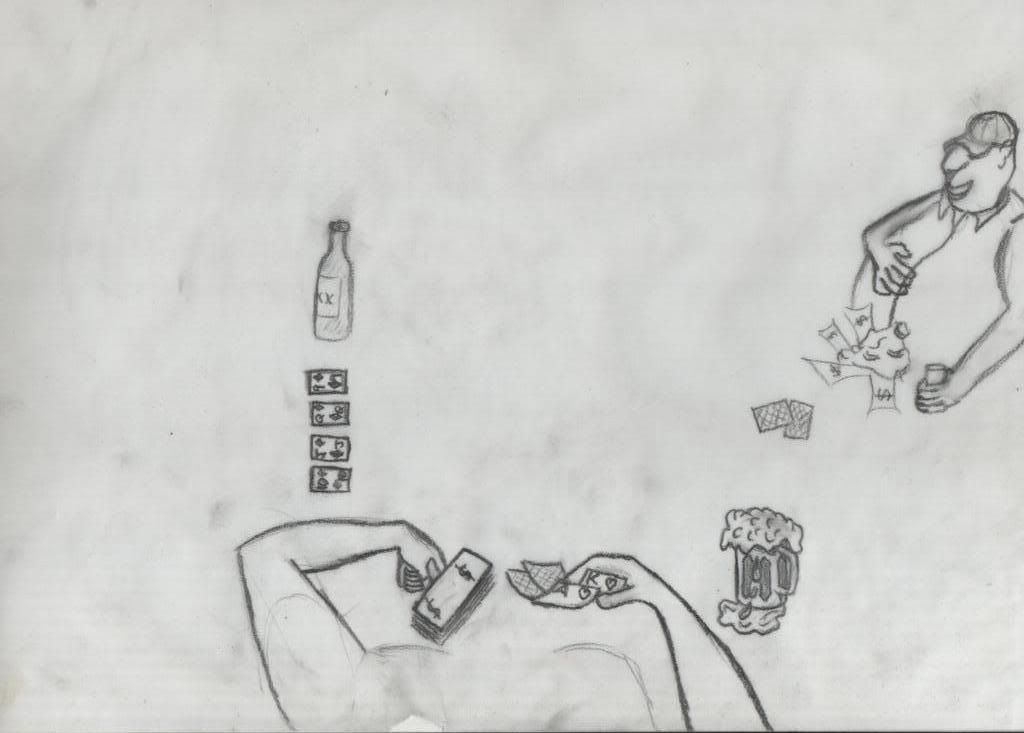
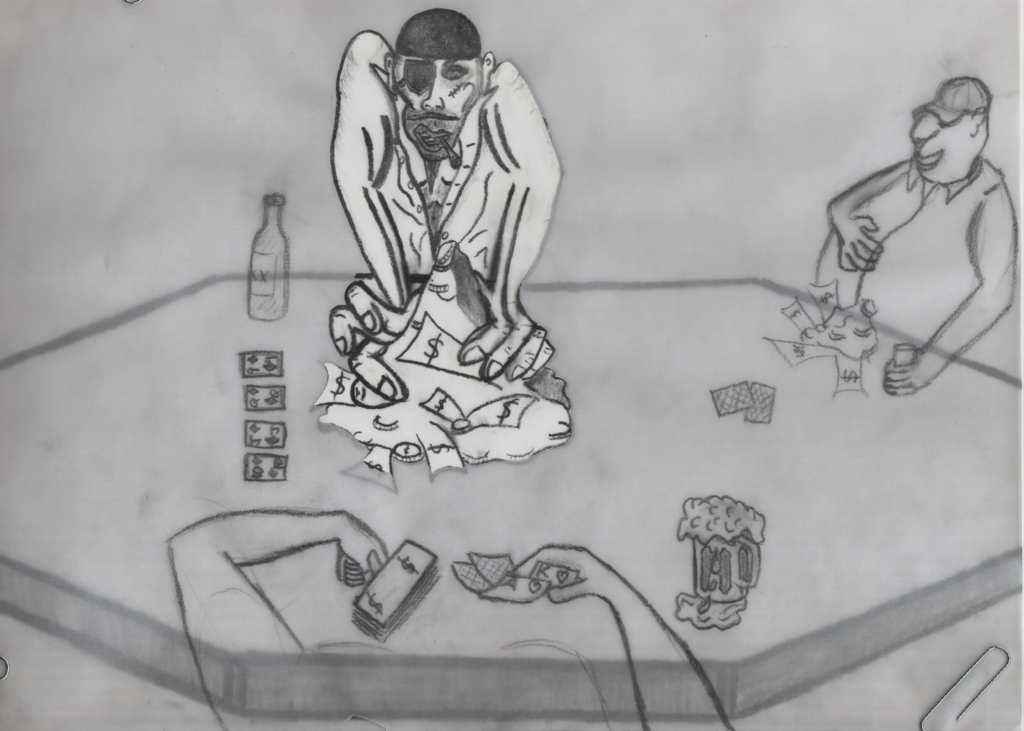